Showing posts with label holiday. Show all posts

Tuesday, February 7, 2012

Hey Cupcake!

Sunday night I saw the cutest little craft! To get the full details, check out the tutorial here.

Cupcake Take Along
I thought it was absolutely darling and decided to make one myself. I sat down for a few hours yesterday and created a suite of Silhouette cut files for each of the pieces. You can kind of see the cut pieces in this picture of what my table looked like last night. Did it feel a little tedious to create all of those files? Yes, but now that it's done I can make as many as I want in barely any time at all!

My Craft Table Last Night
I got most of it put together last night, but I'm still missing a few pieces. I ordered the tubes for the sprinkles (see the link above if you don't know what I'm talking about) and they should arrive tomorrow. I'm hoping to get it finished and share more details then. In the mean time, I have some dressies to sew before Thursday! Eek!

In Progress
PS. I am so grateful that I happened to have all of these papers and ribbons on hand. All I bought was the cake mix, icing, and the embellishment to the left of "Hey CUPCAKE!" Now I just need the tubes to arrive, and to track down some sugar hearts. That shouldn't be too hard this time of year. :)

Monday, February 6, 2012

Heart Felt Felt Hearts

When I was little, my mom made felt heart pouches for our Valentine candy. Every Valentine's Day we would pick our favorite heart and she would fill them with our goodies. We are all old enough now that the tradition has died out (as far as I know).

Since I'm going to be away from my kids on Valentine's Day this year (Darin and I are going to Cali. So excited!), I decided to continue the tradition for them so that they will know they are loved even if we are apart. (Not that I expect them to get it since they are still toddlers.)

These are really simple. You don't have to sew them by hand, I just chose to since I wanted the stitching to be noticeable. Feel free to sew a pouch up on your machine, or just glue one together.

I started with two 6"x7" hearts. I embellished the front of one heart, and cut a slit in the back of the other heart. I reinforced the opening with a blanket stitch to help keep it from getting stretched out. Then I blanket stitched the front and back pieces together. Easy-peasy.

Here is the end result.

Decorated Fronts
Back with Slit Opening
Candy-filled Back
Candy-filled Front
I made both of these last night in a few hours. Despite the simplicity, I think they turned out cute. It also brings a warm, fuzzy feeling to my heart to see a tradition carried on. Happy Valentine's!

Tuesday, December 6, 2011

Christmas Decorating 2011

There is only one room that I really decorate for Christmas. That is the parlor. And why is this? Because it has a door so that I can keep eager little fingers from breaking touching anything. Mwahahaha!

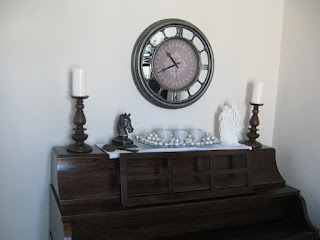
Let's start with the piano. I flanked either side with a pair of candlesticks I got on clearance at Sears. They are destined for a coat of silver or black paint. I'll get to it after deciding. Next is a polyresin horse head that I think is awesome and Darin thinks is weird. I laid a pair of big polyresin vintage keys  next to the horse head just because. Continuing right is the centerpiece. I bought a trio of snowflake votives at Bath & Body Works years ago. These are placed on a large, antique, glass platter that I inherited from Darin's grandmother. Then I filled in the empty spaces with cheap mini silver ornaments from Walmart. Next to that is a white statuette of the Holy Family I picked up at Walmart also years ago. I love this piece because it is very intimate and the detailing is exquisite. (I just spelled exquisite correctly on my first try!)

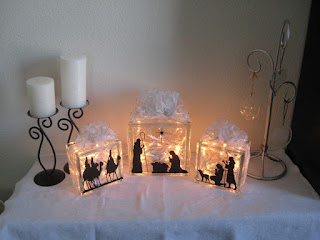
This is the tablescape on top of the short bookcase. I left the swirly candlesticks with the glitter white pillar candles. The wedding pictures are replaced with my glass block nativity (three glass blocks, stuffed with white Christmas lights, topped with ribbon bows, and decaled with black vinyl silhouettes of a nativity scene). On the right is an ornament stand I picked up at Goodwill last year. It displays the custom ornaments I have gotten through personalizationmall.com (love them!) over the years. The one of top is a heart etched with "Our First Christmas," our names and wedding year. The other two are ovals etched with "Baby's First Christmas" and the boys' names and birth years, respectively. I'll have to find a second stand or something if we have anymore kids.

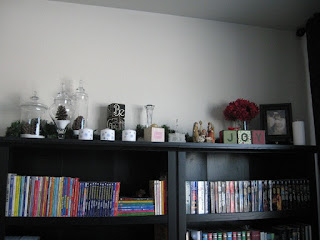
As you may have noticed, the top of my bookcases has pretty much become storage space. But I decided to change that for Christmas, at least. I took down all of the things I'm worried about the boys breaking and put up the following (from left to right) intermingled with a faux pine garland: 3 apothecary jars (each filled with a layer of Epsom salts for faux snow and a pine cone), three small pillar candles stamped with little snowflakes, my 'Be' blocks, a recently acquired crystal candlestick, a little wooden block votive holder decoupaged with scrapbook paper and the word 'believe' complete with glass votive and candle, our glass Bountiful temple wedding cake topper (I wasn't going to put that in reach of little fingers no matter what), a polyresin nativity, a set of 'JOY' blocks that my super crafty sister-in-law made for me, a bouquet of cranberry red flowers in a clear glass vase from the dollar store (I should really etch that vase, huh?), a sepia toned photo from our first family Christmas photo shoot when our first-born was a baby (there's a tree and fireplace in the background and everything), and finally, a plain white pillar candle.

And what would Christmas be without a tree? Our tree sits in front of a window, so it's impossible to get a good picture of it from the front during the day with our little camera. But here is a side view. It is dressed in silver ball and acrylic icicle ornaments serving as a backdrop to the family ornaments. Growing up, Darin's mom had a tradition of buying each child a new Hallmark ornament each year. We have chosen to continue the tradition. There are also some ornaments that belonged to me as a child (like that European painted egg), as well as a few of the snowflakes that my mother crocheted when I was a baby. Those adorned my family's Christmas tree every year for as long as I can remember.


The tree itself isn't much to look at, but considering that we got it for $7.50 in an after-Christmas sale, I really can't complain. It looks better from this angle. ;)


So there you have it--the bulk of my Christmas decorating. Anyone else calling their decorating good enough and bundling up with a cup of hot coco? Have you surprised yourself lately with being able to put together a half-decent display on a table or bookcase? Are you loving the snow (if there is any in your area) but kind of wishing it would go away, or at least melt off the roads?

Friday, November 18, 2011

Let It Snow! Coffee Filter Snowflake Tutorial

Is it too early to be thinking about Christmas? Absolutely not! But this post isn't about that. This post is about the fact that I have 200+ coffee filters cluttering up my space. They need to get out of the plastic bag I corralled them in and start doing something useful!


While skimming along in blog-land trying to find a use for these freeloaders, I noticed that quite a few people making the most extraordinary things from coffee filters--flowers, wreathes, bats, spiderwebs, and snowflakes. I, like you, thought it was too early to start making snowflakes; then I thought about the sheer number of coffee filters I have, waiting to be used. I quickly changed my mind. If I start now I might be done by December (or January).

Here's how I do it:
Step 1: Fold & Cut
Fold the coffee filter into twelfths (for a six pointed snowflake), then channel your inner kindergartner and cut those snowflakes! (The one I cut here was supposed to look like a spider web in honor of Halloween; but I didn't like how it turned out, so I didn't post about this back in October.)

Step 2: Starch
... and Dry
I wanted to give my snowflakes a little stiffness since coffee filters are the weight of heavy tissue paper, so I sprayed them with heavy starch and let them air dry on an old towel.

Step 3: Iron
You may notice that the snowflakes look a bit crumpled after being starched. Once they are dry, iron them flat. I used a medium-high setting on my iron. (Tip: Be careful not to accidentally fold over a piece and iron it down. I almost did this a lot.)

And here is the finished product!


At this point, you are free to put them wherever you like--on a window, the inside of a vase, taped on a package, under a clear glass cookie or pie plate. Wherever your imagination leads you!

I chose to tape mine to the wall.


I find it very fun and festive. And it's fascinating to me to see how many different patterns I can come up with!


Have you been channeling your inner kindergartner lately? Are you gearing up for some winter festivities? Have any Christmas decorating plans in the works?

Monday, November 14, 2011

Let Them Eat Pie

I don't know why, but now that our Stake Conference is over, I'm ready to dive into Thanksgiving and Christmas. Weird, but there it is.

In that spirit, I saw this on younghouselove.com a few minutes ago, and it reminded me of a particular holiday.


Years ago, we were having Thanksgiving (or Christmas, I forget now) at my Grandma's house. The bird wasn't done yet and everyone was hungry, so Grandma declared that we were going to eat pie before dinner. It was the stuff of legend. I would like to make it a tradition. (Honestly, who wouldn't want to make it a tradition?)

When I saw this, it reminded me of that holiday. I am totally inspired to make a similar poster for my grandmother that reads "let them EAT PIE".

Happy Holidays, everyone!