Tuesday, November 29, 2011

The First Cuts

My new Cameo arrived on Monday. Darin didn't want me to open it. Something about it being a Christmas present and I couldn't play with it until then? I don't know. Anyway, I've been experimenting with it and am pleased as pop (is my family the only one that uses that expression?) with it.  See, happiness ->  :)


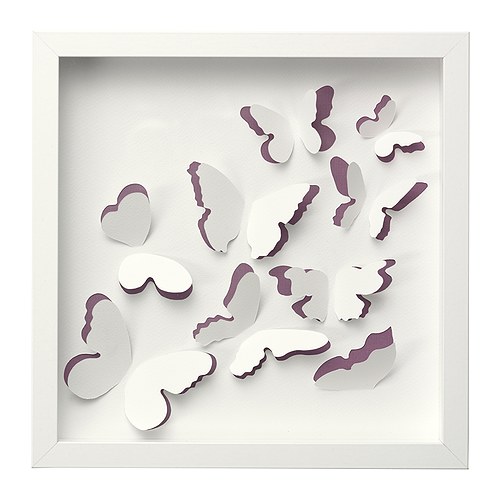
Yesterday I used it to finish a project that I have been stewing over for a while. I saw this at Ikea and was totally inspired. I decided to do my own version for my little sister for Christmas.
Ikea OLUNDA
After figuring out how the Silhouette Studio software works (which you can download for free here, by the way), I put together this little number in barely anytime at all. A little cardstock; a sheet of patterned pink, scrapbook paper; a $6 scrapbook frame from Walmart; and I was in business. Not bad for a first project.


When I first conceived this idea two months ago, I was planning on doing a simpler design and cutting it by hand. I am so glad I waited! I was able to get so many intricate details with the Silhouette Cameo and it is so pretty! I especially love how the fairy's wings turned out. I really hope my sister likes it. :)

Monday, November 28, 2011

Perpetual Birthday Calendar

My hubby and I were talking to his sister last night, and we got on the subject of birthdays. It dawned on me when she mentioned that her husband's birthday is coming up, that I need a birthday calendar.

I thought about designing my own, but why do that when there are plenty of cute ones out there that I can download for free? I have other things to do with my time today than spend hours deciding on a scheme, searching for clip art, and designing my own calendar.

After a quick Google image search for "perpetual birthday calendar free," I settled on this calendar by Elephantshoe Stationery Studios at The Pretty Blog.

http://www.theprettyblog.com/2011/07/birthday-calender-free-printables/
After printing on cardstock and cutting with my Fiskars paper trimmer, I decided to hang it on the wall next to my calendar (so I don't lose it). I used a small hole-punch to--you guessed it--punch a small hole at the top of each page. To keep things simple, I chose to hang the pages on a small nail. At the beginning of every month I'm going to have to take all twelve pages down to rotate to the new month, but it's a small price to pay since I am doing this on the cheap and not having my calendar spiral bound.


Super easy and the whole project probably took no more than half an hour! Love it! Now to track down all of those birthdays and fill it in...

Are you in need of a perpetual birthday calendar? Got any super simple paper projects in the works?

PS. In case you are wondering, I cut one page then used it as a guide to cut the other eleven so that they would all be the same size. Then I used a scrap of cardstock as a template to ensure that all of the punched holes would line up.

Wednesday, November 23, 2011

Quick and Pretty Dollar Store Project

I've been preoccupied lately with making file folder games for my toddler, but I did squeeze in this little project.

I bought a little vase and candlestick on my last trip to Dollar Tree. I had already purchased the Glass Bond for another project (I looked for E6000, which seems to be the most popular adhesive for projects like this, but I think my Hobby Lobby was sold out), so I would say that the grand total for this project was $2.


I simply adhered the vase to the candlestick, following the directions on the Glass Bond. It was so simple, but I think the finished product is quite pretty. Of course I'm a sucker for clear glass.


I'm excited by how versatile this little piece is. It's not very large, but I can use it as a vase for a small bunch of flowers, a votive candle holder, a candy dish, or serve plastic silverware or condiments out of it at a party.

Have any quick and inexpensive projects you've been working on? Any guesses for what I'm going to fill it with for the holidays? (I don't know the answer myself, but I'm looking forward to discovering it!)

Monday, November 21, 2011

One More Thing for the Wall

By now you are probably all sick of reading about my gallery wall, but I did have one more project in the works that I decided to finish after posting about the wall. It is now finished and hung with all the others.

It all started, like so many things, with Pintrest. I saw this and completely fell in love.


It's black, it's shiny, it's contemporary, and it sparkles. Basically, it's everything that I love in decor.

I had a necklace rack that I made about fifteen years ago, with my mom's help, that I wanted to repurpose as wall art. I had incorporated it in the original gallery wall layout, but didn't know how I wanted to decorate it. After seeing this centerpiece, I decided to do an interpretation of it on my old necklace rack.

I started by purchasing a length of crystal garland, some large crystal drops, jewelry chain, and a package of jumprings.


I attached the large drops to sections of the crystal garland and chain (this will make a lot more sense in pictures below), and I spray painted the necklace rack with black gloss spray paint left over from the canvas piece I did a couple of weeks ago. Once the paint was dry, I attached the lengths of crystal with jumprings.


It was looking mighty fine at this point, but was still a bit plain. I decided to try something that I had been pondering and Google searched about. I decided to try using contact paper to add some text to the piece. Ideally I would have used vinyl, but I'm working with what I got.


After settling on a font and size, I printed the word "Family" and taped it to my self-healing mat on top of a piece of white contact paper (also known as adhesive shelf liner). Then I got to work with my craft knife. (Have I mentioned that I want a Silhouette?)

After cutting out each letter, I tried a tip I had read about in blog land--using drywall tape in lieu of transfer tape. I cut a length of drywall tape and placed it over my whole cut piece, then carefully removed the pieces I didn't want (the outside pieces, if you will) so that the letters will still lined up straight. I flipped the whole thing over and removed the backing to expose the sticky side of the contact paper.


I stuck the whole thing on my painted former-necklace rack and thoroughly rubbed the whole thing to make sure it was good and stuck. Then carefully peeled back the drywall tape, making sure that I didn't pull up any contact paper with it, rubbed the letters again for good measure, and stepped back to admire my work.


I think it actually turned out very well. You can't even tell it isn't vinyl from a distance.


And with it hung on the wall as it is, no one is likely to take a close look at it; just stand there and admire it. Oh, am I the only one who does that?


Anyone have some brilliant (and cheaper) alternatives they would like to share? Any new crafts that you sit back and lovingly admire? Have you been inspired lately to reinterpret something you have seen and love to fit your needs?

PS. This project was updated on 1/13/2012 at Updates to "The Wall" with Cameo.

Friday, November 18, 2011

Let It Snow! Coffee Filter Snowflake Tutorial

Is it too early to be thinking about Christmas? Absolutely not! But this post isn't about that. This post is about the fact that I have 200+ coffee filters cluttering up my space. They need to get out of the plastic bag I corralled them in and start doing something useful!


While skimming along in blog-land trying to find a use for these freeloaders, I noticed that quite a few people making the most extraordinary things from coffee filters--flowers, wreathes, bats, spiderwebs, and snowflakes. I, like you, thought it was too early to start making snowflakes; then I thought about the sheer number of coffee filters I have, waiting to be used. I quickly changed my mind. If I start now I might be done by December (or January).

Here's how I do it:
Step 1: Fold & Cut
Fold the coffee filter into twelfths (for a six pointed snowflake), then channel your inner kindergartner and cut those snowflakes! (The one I cut here was supposed to look like a spider web in honor of Halloween; but I didn't like how it turned out, so I didn't post about this back in October.)

Step 2: Starch
... and Dry
I wanted to give my snowflakes a little stiffness since coffee filters are the weight of heavy tissue paper, so I sprayed them with heavy starch and let them air dry on an old towel.

Step 3: Iron
You may notice that the snowflakes look a bit crumpled after being starched. Once they are dry, iron them flat. I used a medium-high setting on my iron. (Tip: Be careful not to accidentally fold over a piece and iron it down. I almost did this a lot.)

And here is the finished product!


At this point, you are free to put them wherever you like--on a window, the inside of a vase, taped on a package, under a clear glass cookie or pie plate. Wherever your imagination leads you!

I chose to tape mine to the wall.


I find it very fun and festive. And it's fascinating to me to see how many different patterns I can come up with!


Have you been channeling your inner kindergartner lately? Are you gearing up for some winter festivities? Have any Christmas decorating plans in the works?

Wednesday, November 16, 2011

Dear Santa

Dear Santa,

For Christmas this year I would like a Silhouette CAMEO.

It is a fantastic personal cutting machine that will slice through anything from vinyl to fabric. The best part? No cartridges! I can choose to either download images from Silhouette's online library, or I can design my own patterns! I can even print out an image then cut it out. Not to mention that I can import any font on my computer into the Silhouette software. The design possibilities are endless!

Thanks for understanding, Santa.

Love, Heather

Tuesday, November 15, 2011

Gallery Wall: Part 6, The Big Reveal!

Yay! Not only am I finally getting around to the big reveal, but I can also cross this one off my to do list now!

So before getting on to the juicy goods, let's take a moment to remember how the wall going up the stairs used to look.


Yeah, pretty bor-- *yawn* ZZZzzz...

Huh? Oh, sorry. I must have dozed off there. Yeah, as I was saying. Pretty boring.

And now... Behold! The gallery wall in all of it's finished close enough glory!


A home is a work in progress. A gallery wall is an extreme example of that.


I plan to add to it over the years.


There is still plenty of wall before I reach the ceiling! (Even then, I'm sure I could start branching out on the adjoining wall.) Yay! Happiness. :)


Anyone inspired to try their own yet? Good luck, my fellow peeps with blanks walls!