Showing posts with label wall decor. Show all posts

Monday, November 19, 2012

A Dose of Awesome-Sauce

This is me and my little sister Melissa, the art student. (In case you are wondering, this photo was taken during a break at her bridal's photo shoot.)

2010
Anyway, she is an amazing artist. She drew this lion for my son last Christmas. Isn't it amazing! I'm hoping she can draw one for each of my kids over the years.

(click to enlarge)
This piece is very appropriate for Eric. He had a very rough two-month early start in this life. But he fought his way through it and is doing so great now. He has the heart of a lion. Through that experience, I found that I have one too.

In addition to sharing sheer awesomeness, I also wanted to point out that family photos and pieces crafted by your own two hands or by someone who loves you make the best wall decor ever.

Friday, January 20, 2012

Stairs of Entertainment

I have a crying baby on my lap, so hopefully I can be brief.

When we moved to Denver after graduation, I was overjoyed to have a real theater in town. Darin and I have seen The Phantom of the Opera, Wicked, Blue Man Group and The Lion King. We are too cheap to shell out the extra money for a collector's program, but I'm okay with the free programs that are full of advertisements. The covers still look nice and get the point across.

I still have the programs and tickets for Phantom and Wicked somewhere (I hope), maybe Blue Man Group, but I had a plan in mind to start hanging these mementos by the time we saw Lion King this past November, so I still knew where that stuff was.

The stairs leading to our unfinished basement has an entertainment theme to it. Since I eventually want a projector system with surround sound down there, this seems appropriate. But being that it is a basement stairwell, not well lit, and typically behind a closed door, I haven't felt the need to shell out the big bucks for nice frames. This is what I have done instead.

I found a two-pack of 18"x12" frames at Michaels for $8. Four bucks a frame? Score! Ideally, I would be able to use floating frames, but that is even more expensive than regular frames. I decided on a compromise by using black poster board as a background. Unfortunately, I didn't have any black on hand. After thinking about how I didn't want to go shopping for new sheets of poster board for two days, I decided to try an experiment with the yellow poster board I did have laying around--and that I would probably end up never using. (It came in a pack of assorted colors.)

Here we have the frame, poster board, program and ticket.


First I set the poster board on a self-healing mat and used the glass from the picture frame as a template for cutting the poster board using a craft knife.


I was able to get two 18"x12" pieces out of one sheet. I laid them in my "painting box" (a cardboard lid from a box for set of shelves we bought last year) and got ready to test my theory about painting poster board.


I didn't want the finished pieces to have an unnatural sheen, so I used flat black spray paint. I several light coats of paint. I kept on making passes until the poster boards were evenly coated. Then I let them dry overnight.


This is how it looked the next morning. I would deem this experiment a success! I'm so relieved that it worked so I no longer have to wonder what I'm going to do with all of those sheets of blue, green and yellow poster board I have. (They are left overs from when Darin built the boys a train for Halloween.)


Here it is all together. I used glue dots to hold the ticket in place, but the program is thick enough that the pressure between the glass and the backing is enough to keep it from sliding.


We also got a poster signed by the cast, that night. We would not have done it, but they were doing this thing where one could get a free poster for donating to a charity they were supporting. We decided to support the charity, so we got a poster. It is also mounted on a piece of black poster board, but in a larger frame I picked up at Walmart.


Here are the hangings at the bottom of the stairs. The blank one I hung just so that it wouldn't get lost/marred/broken. I'll fill it with a program and ticket with one of the other productions we've been too, if I find them; or a program and ticket from when we see Beauty and the Beast in March. Wicked is also back in town. We are still on the fence about whether or not to see it again since tickets can be kind of pricey.


Anyway, on the other side of the stairwell is a ledge that only makes sense when you see how they constructed the basement in relation to the garage. It's one of those oddities that when you first move in you look at it and think, "What am I ever going to do with that?" But I quickly decided that it was an excellent place for storing our ever expanding DVD/Blu-ray/Wii games collection.


This is what it looks like from the top of the stairs. I'm looking forward to filling the wall on the right over the years as we attend more stage productions. And we are almost to the point where we are going to start installing shelves on the left to make room for more disks. It's kind of exciting for me to look at stuff like this, all of that blank wall space, and see the opportunities in future years that it represents. :)

Monday, January 16, 2012

If These Walls Could Talk

Happy Monday! Words are failing me this morning, so I will let the pictures do the talking. :)

I have here three vinyl lettering projects that I did last weekend. The first is a solution to a problem. I had a blank wall over the TV (boy, does that need to be replaced), and I've taken a liking to dictionary definitions vinyl wall decals. I found three that I kind of liked. (See them on Pinterest here.) I took pieces from them and the official dictionary definition, and pieced together one that I liked.

fam·i·ly noun,
A basic social unit consisting of parents and their children, considered a group, and usually residing in the same dwelling place · the result of two people falling in love · individuals who share a common ancestry through blood, adoption or marriage · a group of individuals united in common beliefs · the family of human beings.
My walls are so textured that it took a while to get it all up there, but I eventually managed it. I am very happy with how it turned out. One would think that a framed piece would work on any wall, but sometimes it is just too much. I have found vinyl lettering to be the answer in all three of the cases I have posted here.


"Relax" for the downstairs bathroom. (Inspired by this popular design.) The white pops against the blue very nicely and goes with all of the other white in the room.


The display on top of the new cube shelves in my bedroom needs a lot of work still, but we're not looking at that. We are checking out the lyrics above the shelves. There are two chess sets on the shelves, which inspired this wall quote, "Treat her like a Queen, She'll make you her King." I love these fonts. And it has been very pleasant to wake up to this reminder every morning. :)


I have so many projects buzzing around in my head. I'm glad that I got these three done. I hope that I can get the others done this week so that I can scratch them off my projects list. :)

Friday, January 13, 2012

Updates to "The Wall" with Cameo

Everyone remembers The Wall, right? It's probably been my biggest project to date. No, wait, that would be painting my bed frame. The gallery in my stair well is in the top five, at any rate.


Anyway, there were two things that I was never quite happy with. (There are three others, but I'm not getting to that right now.) On Wednesday, I fixed that.

First was the anniversary calendar. I still think it is a sweet project. I'm even thinking about selling them in my shop. Unfortunately, I was never happy with how the colors turned out. Instead of printing a new one, I cut one from a piece of black cardstock that had a silver foil flourish with my Cameo. I've always loved this piece of cardstock. I'm glad I found a good place for it. (By the way, the light gray lines are reflections from the railing in the loft. I couldn't get a good angle and avoid them.)

Before
After
The second thing was this piece of wall decor. I was never in love with the font, but since I was cutting it by hand, I needed something more forgiving. Now that my days of cutting things by hand are over, I was able to replace the text with a font I liked better.

Before
After
Just a few small improvements. Did I mention that I'm loving my Cameo? Now I need to paint the big 'N' silver, the two cherry frames black and their mats white. Before I get to that, though, I have a lot of vinyl to cut and get on the walls. I was counting last night; I have eight vinyl projects in the works! I am so glad that my latest order from Sign Warehouse came yesterday. One of the items was 100 yards of transfer tape. Now I can start getting things done!

Tuesday, November 29, 2011

The First Cuts

My new Cameo arrived on Monday. Darin didn't want me to open it. Something about it being a Christmas present and I couldn't play with it until then? I don't know. Anyway, I've been experimenting with it and am pleased as pop (is my family the only one that uses that expression?) with it.  See, happiness ->  :)


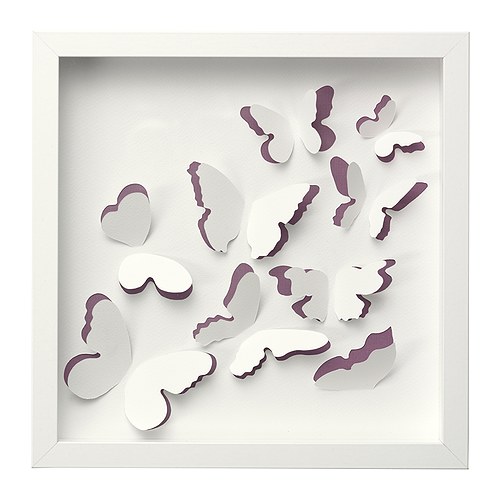
Yesterday I used it to finish a project that I have been stewing over for a while. I saw this at Ikea and was totally inspired. I decided to do my own version for my little sister for Christmas.
Ikea OLUNDA
After figuring out how the Silhouette Studio software works (which you can download for free here, by the way), I put together this little number in barely anytime at all. A little cardstock; a sheet of patterned pink, scrapbook paper; a $6 scrapbook frame from Walmart; and I was in business. Not bad for a first project.


When I first conceived this idea two months ago, I was planning on doing a simpler design and cutting it by hand. I am so glad I waited! I was able to get so many intricate details with the Silhouette Cameo and it is so pretty! I especially love how the fairy's wings turned out. I really hope my sister likes it. :)

Monday, November 21, 2011

One More Thing for the Wall

By now you are probably all sick of reading about my gallery wall, but I did have one more project in the works that I decided to finish after posting about the wall. It is now finished and hung with all the others.

It all started, like so many things, with Pintrest. I saw this and completely fell in love.


It's black, it's shiny, it's contemporary, and it sparkles. Basically, it's everything that I love in decor.

I had a necklace rack that I made about fifteen years ago, with my mom's help, that I wanted to repurpose as wall art. I had incorporated it in the original gallery wall layout, but didn't know how I wanted to decorate it. After seeing this centerpiece, I decided to do an interpretation of it on my old necklace rack.

I started by purchasing a length of crystal garland, some large crystal drops, jewelry chain, and a package of jumprings.


I attached the large drops to sections of the crystal garland and chain (this will make a lot more sense in pictures below), and I spray painted the necklace rack with black gloss spray paint left over from the canvas piece I did a couple of weeks ago. Once the paint was dry, I attached the lengths of crystal with jumprings.


It was looking mighty fine at this point, but was still a bit plain. I decided to try something that I had been pondering and Google searched about. I decided to try using contact paper to add some text to the piece. Ideally I would have used vinyl, but I'm working with what I got.


After settling on a font and size, I printed the word "Family" and taped it to my self-healing mat on top of a piece of white contact paper (also known as adhesive shelf liner). Then I got to work with my craft knife. (Have I mentioned that I want a Silhouette?)

After cutting out each letter, I tried a tip I had read about in blog land--using drywall tape in lieu of transfer tape. I cut a length of drywall tape and placed it over my whole cut piece, then carefully removed the pieces I didn't want (the outside pieces, if you will) so that the letters will still lined up straight. I flipped the whole thing over and removed the backing to expose the sticky side of the contact paper.


I stuck the whole thing on my painted former-necklace rack and thoroughly rubbed the whole thing to make sure it was good and stuck. Then carefully peeled back the drywall tape, making sure that I didn't pull up any contact paper with it, rubbed the letters again for good measure, and stepped back to admire my work.


I think it actually turned out very well. You can't even tell it isn't vinyl from a distance.


And with it hung on the wall as it is, no one is likely to take a close look at it; just stand there and admire it. Oh, am I the only one who does that?


Anyone have some brilliant (and cheaper) alternatives they would like to share? Any new crafts that you sit back and lovingly admire? Have you been inspired lately to reinterpret something you have seen and love to fit your needs?

PS. This project was updated on 1/13/2012 at Updates to "The Wall" with Cameo.

Tuesday, November 15, 2011

Gallery Wall: Part 6, The Big Reveal!

Yay! Not only am I finally getting around to the big reveal, but I can also cross this one off my to do list now!

So before getting on to the juicy goods, let's take a moment to remember how the wall going up the stairs used to look.


Yeah, pretty bor-- *yawn* ZZZzzz...

Huh? Oh, sorry. I must have dozed off there. Yeah, as I was saying. Pretty boring.

And now... Behold! The gallery wall in all of it's finished close enough glory!


A home is a work in progress. A gallery wall is an extreme example of that.


I plan to add to it over the years.


There is still plenty of wall before I reach the ceiling! (Even then, I'm sure I could start branching out on the adjoining wall.) Yay! Happiness. :)


Anyone inspired to try their own yet? Good luck, my fellow peeps with blanks walls!

Monday, November 14, 2011

Let Them Eat Pie

I don't know why, but now that our Stake Conference is over, I'm ready to dive into Thanksgiving and Christmas. Weird, but there it is.

In that spirit, I saw this on younghouselove.com a few minutes ago, and it reminded me of a particular holiday.


Years ago, we were having Thanksgiving (or Christmas, I forget now) at my Grandma's house. The bird wasn't done yet and everyone was hungry, so Grandma declared that we were going to eat pie before dinner. It was the stuff of legend. I would like to make it a tradition. (Honestly, who wouldn't want to make it a tradition?)

When I saw this, it reminded me of that holiday. I am totally inspired to make a similar poster for my grandmother that reads "let them EAT PIE".

Happy Holidays, everyone!

Wednesday, November 9, 2011

Gallery Wall: Part 5, Canvas Art II

As mentioned in part 1 of the post, this project is taking way longer than it should. What can you do?

As you recall, we left our brave little canvas at Step 9: Apply the First Layer of Paint. Our hero endured it well, and we join the canvas now at Step 10...

Step 10: Apply Second Layer of Cut Masking
(Continue to use the large sheet of cut wax paper as a guide.)
Step 11: Apply Second Layer of Paint
(You'll notice that I propped the canvas up on a box so that
I could paint the edges, too.)
Step 12: Remove Masking
(This is my favorite part. Let the paint dry to the touch,
usually at least 20 minutes, then carefully peel off all of
the masking.)
Step 13: Stand Back and Admire!
For all of you lovely people out there who might be wondering about the paints, I used Rust-Oleum Painter's Touch in Flat Black for the base undercoat (step 9a), Rust-Oleum Metallic in Titanium Silver for the base coat (step 9b), and Rust-Oleum Painter's Touch in Gloss Black for the Top Coat (step 11). If I were to do it over again, I would only use the flat black. It's a little too shiny with the gloss. Oh well. Live and learn! The metallic silver came out really nice. :)


So, what do you think? I'm quite pleased with it myself. I can't believe it took four days to finish! ...until I think about all of the interruptions I had to deal with (thanks, boys), then I totally believe it. Do you ever have projects that take much longer than you think they will? Do you have too much short help in your life? Are you totally inspired to try your own DIY canvas wall decor? (Probably not, right? lol.)

Have a good one and happy crafting!

Psst... if all goes well, we might have some full wall shots tomorrow!

Gallery Wall: Part 5, Canvas Art I

You might want to grab a blanket and a nice cup of tea. (I prefer peppermint or raspberry, myself.) It's cold and this could take a while.

I had an idea for a piece of wall art for the gallery wall. It went something like this.


Easy, right? Just some text and a tree. No, not easy. We are on day three now and it still isn't done! There are two hurdles that it making this project take so long. (Three, if you count the children and other life stuff like sleeping. Whatever.) First, the scale of this project is on the big size. I am making it on a 16"x20" canvas that I had in the craft supplies corner of my closet. I would say that's bigger than a bread box. Second, I do not have a Silhouette CAMEO. Oh, how I want one! But that is beside the issue here. Since I do not have a nifty cutting machine, I am cutting out masking for the design and painting this project in layers. Can you say time consuming? Yes, this method takes a while, but one does what one has to with the products on hand.

This is what I got so far.

Step 1: Make a Template
(Yes, I used Excel. It is a surprisingly useful program.)
Step 2: Print and Outline
Step 3: Tape Template Pieces Together
Step 4: Cover with Wax Paper and Retrace Outline
Step 5: Mask Template
Cover everything you just traced onto the wax paper with
masking tape. Just so we are clear, you are applying masking
tape to the wax paper, not the plain paper template.
Step 6: Turn Masked Wax Paper Over, Get Comfortable,
Start Cutting
(For detailed work, I recommend using a craft knife and laying
your project on a self-healing cutting mat or some sort of
protective surface. When working on a less detailed project,
scissors work just fine.)
Step 7: Carefully Lay Cut Masking Right-Side-Up on Canvas
Step 8: Apply Cut Masking to Canvas
(Carefully pick up each cut piece, remove the wax paper
backing--your craft knife can be helpful for this--, and apply it
to the canvas using the full piece of wax paper as a guide. Be
careful not to  move the wax paper as you work so that
everything comes out straight!)
Step 9: Apply First Layer of Paint
(Here I first did a layer of black spray paint...)
(...followed by a layer of silver spray paint. I once heard a tip
about putting down a layer of black before silver to help the
silver finish look right. I thought I would try it.)
So that's where I am with this project. I was hoping to have it done for this morning's blog post, but I suppose this will just have to be a two-parter. :(

Stay tuned!

PS. You can find the rest of this tutorial here!