Sunday, January 29, 2012

Just the Way You Are

If you haven't heard of them yet, there is a group called The Piano Guys, and I'm a fan. This is a little bio from their YouTube page:
Our vision is to create music and videos that inspire people. We want to take that music to the world and make a difference. We have something different to offer from any other YouTube channel. We like to put a new spin on classic stuff and a classic spin on new stuff. Whatever we do, we put our heart and souls into every note and frame.
Okay, now that you've been introduced, watch this video of their cover of Bruno Mars' Just the Way You Are.


I love a good piano piece. *sigh* But that isn't even the best part. Did you see those centerpieces!?!

As evidenced by this post, I have a thing for those bare branches with crystals and candles.

Pinterest
One of these days I am probably going to break down and make one for myself. I'm thinking it will go on top of my dresser or bookcase. We'll see. I'd actually have to make it first! In the mean time, feel free to check out more of The Piano Guys videos and music on their YouTube channel. Happy Sunday!

Wednesday, January 25, 2012

Feather Pendant: Over-priced and Easy (Most Likely) to DIY

I'm sorry, but why on earth would someone pay $2,295.00 for this light fixture? I haven't tried it, but I bet I could make the shade for less than $100.


The base is only chicken wire.


And cording was attached on the top.


My supplies list would look like this:
  • Old, ugly, bare chandelier
  • Spray paint
  • Washer-top lamp ring
  • Plain bottom lamp ring
  • Chicken wire
  • Feather boas
  • Small rope cording
  • Large rope cording
  • Fine gauge wire (for assembly)
  • Hot glue and gun

As I said, I haven't done it, and I just barely found this light fixture here, but I imagine that assembly would go like this:
  1. Clean and spray paint old, ugly chandelier. Let dry.
  2. Cut chicken wire to fit around the lamp rings, and produce the desired height. (Washer-top ring is the top.)
  3. Build frame by wiring chicken wire to lamp rings.
  4. Attach feather boas to frame with wire.
  5. Hot glue rope cording around the top edge.
  6. Fit washer-top ring around your freshly painted chandelier.
  7. Install in ceiling.
So, really, why oh why would anyone pay $23k when they could make it for a fraction of that cost? Does anyone have any thought on improvements/problems with my DIY plan?

Friday, January 20, 2012

Stairs of Entertainment

I have a crying baby on my lap, so hopefully I can be brief.

When we moved to Denver after graduation, I was overjoyed to have a real theater in town. Darin and I have seen The Phantom of the Opera, Wicked, Blue Man Group and The Lion King. We are too cheap to shell out the extra money for a collector's program, but I'm okay with the free programs that are full of advertisements. The covers still look nice and get the point across.

I still have the programs and tickets for Phantom and Wicked somewhere (I hope), maybe Blue Man Group, but I had a plan in mind to start hanging these mementos by the time we saw Lion King this past November, so I still knew where that stuff was.

The stairs leading to our unfinished basement has an entertainment theme to it. Since I eventually want a projector system with surround sound down there, this seems appropriate. But being that it is a basement stairwell, not well lit, and typically behind a closed door, I haven't felt the need to shell out the big bucks for nice frames. This is what I have done instead.

I found a two-pack of 18"x12" frames at Michaels for $8. Four bucks a frame? Score! Ideally, I would be able to use floating frames, but that is even more expensive than regular frames. I decided on a compromise by using black poster board as a background. Unfortunately, I didn't have any black on hand. After thinking about how I didn't want to go shopping for new sheets of poster board for two days, I decided to try an experiment with the yellow poster board I did have laying around--and that I would probably end up never using. (It came in a pack of assorted colors.)

Here we have the frame, poster board, program and ticket.


First I set the poster board on a self-healing mat and used the glass from the picture frame as a template for cutting the poster board using a craft knife.


I was able to get two 18"x12" pieces out of one sheet. I laid them in my "painting box" (a cardboard lid from a box for set of shelves we bought last year) and got ready to test my theory about painting poster board.


I didn't want the finished pieces to have an unnatural sheen, so I used flat black spray paint. I several light coats of paint. I kept on making passes until the poster boards were evenly coated. Then I let them dry overnight.


This is how it looked the next morning. I would deem this experiment a success! I'm so relieved that it worked so I no longer have to wonder what I'm going to do with all of those sheets of blue, green and yellow poster board I have. (They are left overs from when Darin built the boys a train for Halloween.)


Here it is all together. I used glue dots to hold the ticket in place, but the program is thick enough that the pressure between the glass and the backing is enough to keep it from sliding.


We also got a poster signed by the cast, that night. We would not have done it, but they were doing this thing where one could get a free poster for donating to a charity they were supporting. We decided to support the charity, so we got a poster. It is also mounted on a piece of black poster board, but in a larger frame I picked up at Walmart.


Here are the hangings at the bottom of the stairs. The blank one I hung just so that it wouldn't get lost/marred/broken. I'll fill it with a program and ticket with one of the other productions we've been too, if I find them; or a program and ticket from when we see Beauty and the Beast in March. Wicked is also back in town. We are still on the fence about whether or not to see it again since tickets can be kind of pricey.


Anyway, on the other side of the stairwell is a ledge that only makes sense when you see how they constructed the basement in relation to the garage. It's one of those oddities that when you first move in you look at it and think, "What am I ever going to do with that?" But I quickly decided that it was an excellent place for storing our ever expanding DVD/Blu-ray/Wii games collection.


This is what it looks like from the top of the stairs. I'm looking forward to filling the wall on the right over the years as we attend more stage productions. And we are almost to the point where we are going to start installing shelves on the left to make room for more disks. It's kind of exciting for me to look at stuff like this, all of that blank wall space, and see the opportunities in future years that it represents. :)

Tuesday, January 17, 2012

PS. I Bought A Saw

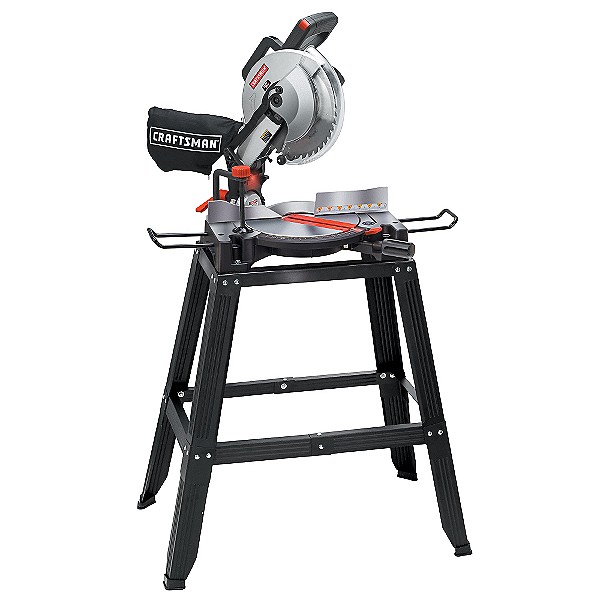
Although I will not be able to write a proper post today, you can still check out the specs on my new compound miter saw. I've wanted one for a very long time now. I pulled the trigger, yesterday, on this one because it had good enough reviews, came with a stand (I don't have a work bench), and cost half of what I thought I would end up paying for a miter saw.

Would we be able to use it to build a deck in the back yard? Absolutely not, but I can do some trim projects around the house. More on that later.

Enjoy!

Craftsman 10" Compound Miter Saw with Stand | Sears

It's One of Those Days

It is one of those days when the children are hanging off my arms. The memory card on my camera is full. I took a shower and got dressed for an event I am attending tonight, before remembering that I wanted to check out my new compound miter saw and I don't want to get sawdust on my clothes or in my hair. And I can't find half of the things I am looking for. It's just one of those days. :(

Monday, January 16, 2012

If These Walls Could Talk

Happy Monday! Words are failing me this morning, so I will let the pictures do the talking. :)

I have here three vinyl lettering projects that I did last weekend. The first is a solution to a problem. I had a blank wall over the TV (boy, does that need to be replaced), and I've taken a liking to dictionary definitions vinyl wall decals. I found three that I kind of liked. (See them on Pinterest here.) I took pieces from them and the official dictionary definition, and pieced together one that I liked.

fam·i·ly noun,
A basic social unit consisting of parents and their children, considered a group, and usually residing in the same dwelling place · the result of two people falling in love · individuals who share a common ancestry through blood, adoption or marriage · a group of individuals united in common beliefs · the family of human beings.
My walls are so textured that it took a while to get it all up there, but I eventually managed it. I am very happy with how it turned out. One would think that a framed piece would work on any wall, but sometimes it is just too much. I have found vinyl lettering to be the answer in all three of the cases I have posted here.


"Relax" for the downstairs bathroom. (Inspired by this popular design.) The white pops against the blue very nicely and goes with all of the other white in the room.


The display on top of the new cube shelves in my bedroom needs a lot of work still, but we're not looking at that. We are checking out the lyrics above the shelves. There are two chess sets on the shelves, which inspired this wall quote, "Treat her like a Queen, She'll make you her King." I love these fonts. And it has been very pleasant to wake up to this reminder every morning. :)


I have so many projects buzzing around in my head. I'm glad that I got these three done. I hope that I can get the others done this week so that I can scratch them off my projects list. :)

Friday, January 13, 2012

Updates to "The Wall" with Cameo

Everyone remembers The Wall, right? It's probably been my biggest project to date. No, wait, that would be painting my bed frame. The gallery in my stair well is in the top five, at any rate.


Anyway, there were two things that I was never quite happy with. (There are three others, but I'm not getting to that right now.) On Wednesday, I fixed that.

First was the anniversary calendar. I still think it is a sweet project. I'm even thinking about selling them in my shop. Unfortunately, I was never happy with how the colors turned out. Instead of printing a new one, I cut one from a piece of black cardstock that had a silver foil flourish with my Cameo. I've always loved this piece of cardstock. I'm glad I found a good place for it. (By the way, the light gray lines are reflections from the railing in the loft. I couldn't get a good angle and avoid them.)

Before
After
The second thing was this piece of wall decor. I was never in love with the font, but since I was cutting it by hand, I needed something more forgiving. Now that my days of cutting things by hand are over, I was able to replace the text with a font I liked better.

Before
After
Just a few small improvements. Did I mention that I'm loving my Cameo? Now I need to paint the big 'N' silver, the two cherry frames black and their mats white. Before I get to that, though, I have a lot of vinyl to cut and get on the walls. I was counting last night; I have eight vinyl projects in the works! I am so glad that my latest order from Sign Warehouse came yesterday. One of the items was 100 yards of transfer tape. Now I can start getting things done!

Thursday, January 12, 2012

Solutions in Squares

I had two problems. First, I was suffering from a storage shortage for all of my craft stuff. (Hard to believe I have a lot of craft stuff, right?) Second, I had a big blank wall in my bedroom and was drawing a big blank on what to do with it.

One fateful Friday (last week), I was perusing my Ikea wish list, and looking at the EXPEDIT 4x4 bookcase. Que light bulb and ding! sound effect.  I have wanted one of these for a long time, but didn't have a specific place or use for one. Now I had both.

Ikea EXPEDIT Bookcase
I measured wall and it was just the right size for this bookcase. Add a few KASSETT magazine boxes  for organization and I was set.

Ikea KASSETT Magazine Boxes
I hadn't even considered using this wall for storage since it is part of the bedroom part of the room, not the "mom cave" part of the room. But it was so perfect. The next afternoon, I dragged my family down to Ikea for a shopping trip.

Here it is in my room.


I'm still organizing, and have plans to get more magazine boxes over time, but I have no doubt that every single shelf will be filled.

Wednesday, January 11, 2012

Laundry Gets Some Love

Remember this post from a while ago when I stumbled upon the idea of adding vinyl decals to my washer and dryer? (I'm always looking for ways to brighten up the laundry room so that the task of washing, drying, folding and putting away clothes isn't so, um... cringe inducing.)

kevin {&} amanda
Sunday night I decided to take the plunge and do it. The hardest part was selecting an image! I put my Cameo and pink vinyl to work making several flower decals. Then I wiped down the fronts of my washer and dryer to ensure I had a clean surface to work with.

Applying the decals was just like applying a vinyl decal to any surface, using transfer tape. Applying the decals around the doors was a little more involved, though.

First, I placed the decal where I wanted using the transfer tape.


It looks great, but it needs a little work.


Second, I cut the vinyl along the seam using either a craft knife or small scissors.


Third, I cut the vinyl around the door frame using a craft knife. Tip: Don't throw out the parts you cut off! 


Here it is five flowers in. Looking pretty good, so far!


I added another smaller flower, and spread around the extra petals that were overlapping on the doors. I put the cut ones up against the door frame for that nice continuous look. Waste not!


It's a work in progress. I've ordered some light gray vinyl to work in a two-toned effect and add some more petals. It should be here tomorrow. I'm so excited! (Is it sad that I get excited over rolls of vinyl and transfer paper being delivered?)

For another look at how someone put their Silhouette Cameo to work to dress up their laundry room, check out this post at Sugar Bee Crafts. :)

Sugar Bee Crafts
Tune in tomorrow to see how a blank wall and a storage problem are helped by a trip to Ikea.

Tuesday, January 10, 2012

Onesie + Dress = Dressie

As mentioned yesterday, I got a new sewing machine for Christmas! Two days after getting home from visiting my parents for the holidays, I had a baby shower to attend. I really didn't want to go shopping (I was still in recovery mode from being out of town), so I decided to make a gift with my new sewing machine! :D

I spent hours racking my brain and perusing the internet to come up with a good idea for a something to bring for a girl baby shower. Finally, I saw a Onesie with a skirt and knew that I had struck gold.

I used this tutorial on Running With Scissors and it worked out great! I highly recommend it. She used Gerber 6-9 mo. Onesies for the dressies (Onesie + dress = dressie) she made. I was working with 0-3 mo. Onesies, so I used a 6"x19" rectangle for my skirts. I also used a blind hem stitch instead of a straight stitch for the bottom hem on the skirt; and I decided to forgo the cuffs.

Instead of stenciling the fronts (I am suffering from a severe lack of fabric paint over here), I decided to take a chance and try appliqués for the first time. I used my Silhouette Cameo to cut the fabric, and it worked pretty well considering that I didn't have any stabilizer on the fabric. There were a few places where it didn't cut through all the way, but those were easy enough to cut with fabric scissors afterwards. (I have since bought some Wonder Under for next time.) I used this tutorial by The Idea Room as a starting point.

And finally, I made a pair of headbands to go with the dressies I made. One I made with shapes cut out of felt and a glued on rhinestone. For the other, I used this tutorial by Get Your Craft On to make a ribbon flower. I loved how the ribbon flower turned out and plan on using this method to make more in the future.

And now for the big reveal! (Sorry, I was in too much of a hurry to take pictures on the day I made them. I started sewing the morning of the shower. As it was, I was a half-hour late to the baby shower. It was totally worth it, though. I thought they turned out great!)

Pink Dressie with Black Stiletto with Pink Bow Appliqué and
Hot Pink Felt Flower with Rhinestone Headband
Purple and Green Dressie with Purple Flower with Button
Appliqué and Purple Ribbon Flower Headband

I am so pleased with how they turned out. I showed the pictures to my sister, and she liked them. She is expecting this spring, so I am planning on making a couple for her baby, too! I'm so excited about the designs I have planned. I'll be sure to share as soon as they are finished!

Stay tuned for tomorrow's post where my appliances get some awesomeness!

Monday, January 9, 2012

A Big Christmas Surprise

We are finally home from visiting my family for Christmas (all good, even with the stomach bug that went around), and getting back into the swing of things (at least a little). It is always amazing to me how long it takes to get back in the groove of life.

As you all know, I got my Cameo that I have been using wanting for Christmas. But I got another big surprise that I was completely clueless about.

It went something like this:
(I have a tradition of tying my hair back with a ribbon from one of my presents on Christmas morning, so I'm the one on the right. My sister is on the left.)


Yep, my mother bought us sewing machines. I was overwhelmed.

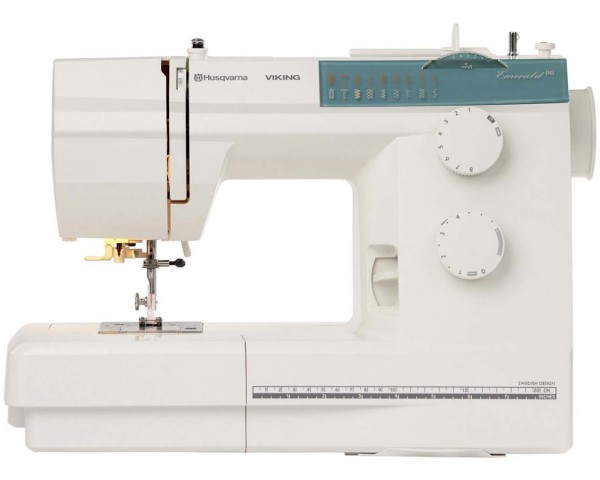
I give you the Husqvarna Viking Emerald 116.


I think I am still in shock. It is so nice and so smooth and can do so many things. There is even a built in table showing what settings to use for the most common stitches for weave, stretch and synthetic materials so you don't have to guess what tension setting or stitch length to use. It can even do a buttonhole! (That was my biggest problem with my old hand-me-down machine. I couldn't figure out how to make a nice buttonhole.) I love it.

THANK YOU, MOM!

Tune in tomorrow to see the first project I did with my new sewing machine when I got home.